Welcome to pure deliciousness! I make this fantastic concoction every Thanksgiving to joyful acclaim and many happy sighs. In fact, when my children are asked what they need to have in order for it to feel like Thanksgiving, they will always say “Chocolate Cheesecake!” It is definitely part of a scrumptious tradition! If you don’t love rich chocolate, then there is nothing to see here. However, if you consider yourself something of a chocoholic, you have found your new favorite dessert!

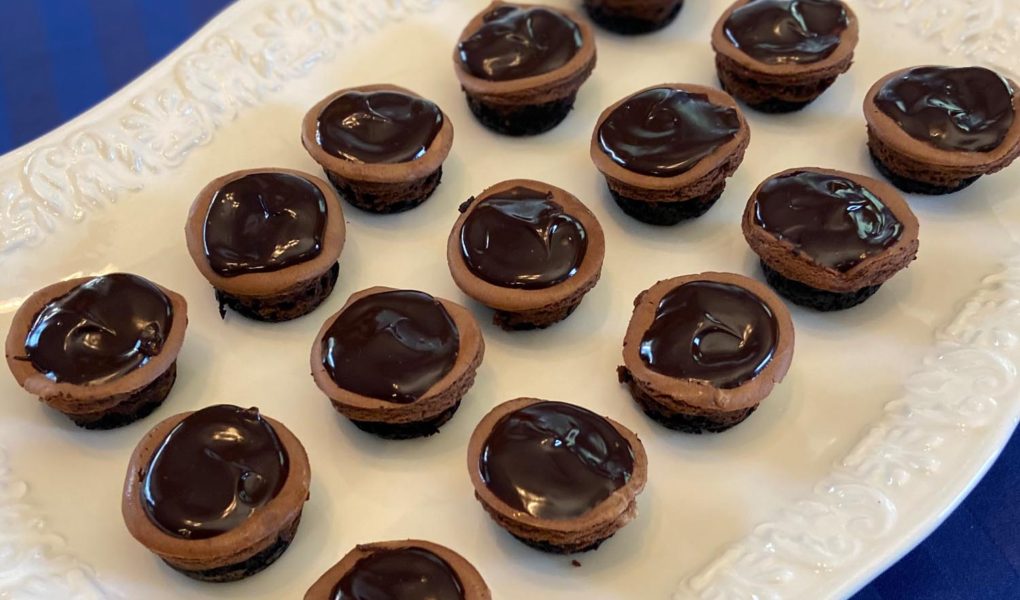
At some point, over the years of creating this cheesecake, I began adding 50% more to the ingredients and making mini cheesecakes as well, and those always disappear first! They are the perfect combination of rich crust, delicious filling and chocolate ganache. The recipe below is for one large cheesecake or several mini cheesecakes. You are going to love them!

This is not a fast dessert. It’s not so quick as a batch of cookies or a tray of brownies. This is an intermediate recipe and is completely doable, it just requires a little bit of time. Plan on starting the day before you need the dessert allowing time for the cheesecake to sit in the oven after the oven is turned off as well as to cool overnight in the fridge (or at least 2 hours) before you top with ganache. Read all the instructions first as there are some variables for mini muffins compared to the full size cheesecake.

Fair warning: Once you create this cheesecake people will only accept this dessert from you from this point forward. Create at your own delicious risk! 😉 Enjoy!
Here are a few items I use every time I make this recipe: Cookie Scoop, Silicone Muffin Pans, Springform Pan, One piece Rubber Spatulas. Have fun!! 🙂

Double Chocolate Cheesecake and Mini Cheesecakes too
Equipment
- Springform pan, silicone mini muffin pans, silicone muffin pans
Ingredients
Crust
- 2 1/4 cups oreos, or chocolate graham crackers crushed in a food processor or blender (about 9 oz.)
- 6 Tbsp Butter melted
- 1/2 cup Brown sugar (ONLY for graham cracker crust, not oreos)
- Increase these ingredients by 50% or up to double these ingredients if you are only creating mini cheesecakes! (More surface area!)
Cheesecake Filling
- 1 1/2 cup heavy whipping cream
- 1 Tbsp cocoa powder
- 12 oz Dark or semisweet chocolate chopped
- 2 8 oz bars of cream cheese room temperature
- 1 cup granulated sugar
- 1 cup sour cream
- 1 Tbsp Cornstarch
- 1 Tbsp Vanilla
- 3 eggs room temperature
- Note: Do not increase the filling for mini cheesecakes
Chocolate Ganache
- 1 cup heavy whipping cream
- 8 oz. Dark or Semisweet Chocolate
- Increase these ingredients for the ganache by 50% up to double if you are only creating mini cheesecakes.
Instructions
- Prepare the pans for your cheesecake. If you are creating a regular size cheesecake. Spray the bottom of your 9 inch springform pan with baking spray. A large cheesecake requires a water bath. Wrap the the outside of your springform pan with 2 layers of tin foil to protect the cheesecake from the water.
- If making mini muffins or regular muffins, spray the silicon pans with baking spray. You can use regular metal muffin pans but you will need to use paper or foil liners. Every mini muffin is a bit different size. I can create about 72 mini muffins with this recipe and my pans. Or 48 minis and 12 regular sized muffins. (I often double the crust and double the ganache topping to accommodate all the minis!)
Create Crust:
- Pulse the Oreos or graham crackers in a food processor or blender until they are finely ground.
- Melt the butter in the microwave and blend with the cookie crumbs. (If you are using graham crackers, add the 1/2 cup of brown sugar)
- Press the crust into your pan or pans. For the large cheesecake cover the bottom, and only a little of the sides with the crust. Make the crust level. For mini cheesecakes, scoop a small amount of crust into each little space! The crust for the minis should be thin! I often use my gloved fingers to press the crust into place. (Just use a sandwich baggie on your hand!) Have kiddos help with crust pressing!
Create Cheesecake Filling
- Heat water on the stove or in the microwave for the water bath (Only for the large cheesecake) You will need approximately 6-8 cups, enough to cover 1/3 of the cheesecake pan on the outside.
- On the stovetop in a medium saucepan blend the heavy whipping cream with the cocoa powder. Heat the cream on a medium heat until it begins to bubble at the edges of the pan almost to boiling, but not quite.
- Add in the chopped chocolate. I often use Hershey's Special Dark or Nestle 53% cocoa chips. (Lindt adds too much oil, Ghirardelli and Godiva have also been good). Mix the chocolate and the cream until the mixture is smooth.
- Set aside the chocolate mixture and allow to cool for 5 minutes or so. Preheat your oven now to 350 degrees
- With your electric mixer beat the cream cheese and sugar until smooth.
- Add in sour cream and cornstarch and mix well
- Mix in vanilla and eggs.
- Now take about one cup of your cream cheese mixture and whisk it into the chocolate mixture allowing it to cool and blend.
- Now pour all of the chocolate mixture into the cream cheese mixture and whisk until smooth. Hooray- you have a luscious batter!
- Pour the batter into the prepared pan! For the minis you will want to use a cookie scoop that about matches the size of your pans for easiness.
- Bake at 350 degrees Fahrenheit. For the regular cheesecake place the now filled springform pan that is protected by tin foil into a larger baking pan. Gently add enough hot water to the outside baking pan until it creeps up about 1/3 of the way of the sides of the springform pan. Bake the cheesecake until it becomes puffed and gently set about 1 hour. Turn off the oven and allow the cheesecake to cool in the oven for an additional hour. Remove cheesecake from the oven, remove tin foil and allow to chill at least two hours to overnight in the refrigerator.
- For regular muffin and mini size, I add an oven safe dish full of water to the bottom rack while the oven is preheating and cooking allowing steam to occur, but skipping the water bath. Time for baking regular muffins is around 22-24 minutes in my oven, then I let them cool in the oven for 20 minutesMini muffins bake for 18 minutes and then cool for 10 minutes in the oven. Chill for 2 hours up to overnight.
Chocolate Ganache
- Heat whipping cream in a medium saucepan on medium heat stirring until edges begin to bubble. Take the cream off the heat and add chopped chocolate and whisk until smooth.
- Pour Ganache onto chilled cheesecake and then chill again. 30 minutes to several hours.
- For muffins and minis use a spoon to add ganache to the top.
- Note: Ganache is your friend! It covers any cracks and leaves a glossy beautiful top. Hooray for ganache!
- Optional: You can garnish with shaved chocolate or white chocolate, or sliced strawberries. Only add fruit on the day that you will serve it!
- You can freeze this cheesecake as well. Wrap it tightly with plastic wrap and freeze for up to 3 months.


Join our group! We will email you when we share a new recipe! Don't worry--we also detest spam!
By submitting this form, you are consenting to receive marketing emails from: . You can revoke your consent to receive emails at any time by using the SafeUnsubscribe® link, found at the bottom of every email. Emails are serviced by Constant Contact